Showing posts with label Chatbots. Show all posts

June 29, 2021

Using Kubernetes with Oracle Digital Assistant

 In this blog post, we are going to see how we can include Kubernetes in the Oracle Digital Assistant (ODA) solution. 

Where can we include Kubernetes with ODA:

We can integrate any backend services with ODA using the custom components (using SDK) services in ODA. And these services are of four types.

  • Embedded Container: To upload the custom components code into the given embedded container of the ODA
  • Oracle Mobile Cloud: To connect the custom components deployed in the Oracle Mobile Cloud Service (OMCS) using its backend and service URL.
  • External: To connect the custom components deployed in the external or third-party servers.
  • Oracle Function: To connect the custom components deployed in the Oracle Functions cloud service using its URL.
Out of the above given four types of services for the custom components, we can use the type "External" to connect the custom component code deployed in the Kubernetes.


Why do we need to use Kubernetes with ODA:

As you know, ODA has inbuilt AI and ML processing which helps to train the chatbot. And the training is a continuous process to make the chatbot better. And also ODA supports multiple skills development. When ODA has more skills that are connecting with multiple backend services, we may need to write the custom components for multiple skills. And for complex chatbots, changing the code and uploading the ODA every time will be a very tedious task. So, in such scenarios, if the team is willing to use Kubernetes for the custom code development, then they have a choice to do so. They can use the Kubernetes to automate the deployment process without impacting the front end of ODA.

How to connect Kubernetes with ODA:

                     Oracle Digital Assistant - Custom Components Service


Once the custom component code is deployed in the Kubernetes, configure its public URL and its authentication as shown in the above image. Then the chatbot is ready to be connected to the backend.

March 10, 2021

Integrating WhatsApp to Oracle Digital Assistant (ODA) as a client via Twilio

In this post, we are going to see how to connect WhatsApp as a client to have a conversation with Oracle Digital Assistant. 

In order to achieve this integration, we need to create a sandbox in Twilio and create a channel in ODA for Twilio. We need a Twilio account to do this integration. We will see each of these setups.

Setup Testing Sandbox in Twilio for WhatsApp

We need to create a sandbox for WhatsApp, which follows the below procedure. 

  • Login to Twilio
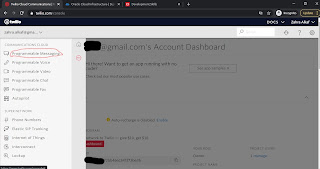
  • Under "All Products & Services", select the "Programmable Messaging" option. 
Twilio Programmable Messages Option
  • Its dashboard will be opened. You can observe a message like below to start connecting WhatsApp. Click on the link.

Building with whatsapp

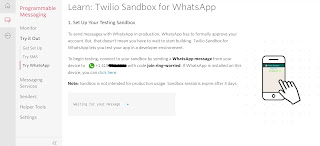
  • Sandbox setup for WhatsApp will be started
Setup testing Sandbox for WhatsApp in Twilio
  • Save the given phone number on your mobile
  • Send the given message (ex: join ring-worried) from your WhatsApp to the above number
  • You can observe the confirmation on the screen for your message
Setup testing Sandbox for WhatsApp in Twilio 2
  • Click on the "Next" button below
  • Ignore the step "Send a One-Way WhatsApp Message" and click on Next
  • You can send a reply to the message on your device which will be displayed here. You can send a message from the console and see the message on your WhatsApp. This is to test the Two-Way messages from your WhatsApp to Twilio and vice versa, though this step is not mandatory.
Setup testing Sandbox for WhatsApp in Twilio 3
  • Click on Next
  • Copy and paste the webhook URL created in the ODA channel (which will be shown in next steps) into the "WHEN A MESSAGE COMES IN" input field as shown in the below picture
Setup testing Sandbox for WhatsApp in Twilio 4
  • Click on Save

Setup ODA Channel for Twilio

  • Login to ODA
  • Go to Channels
  • Click on "+ Channel" button to create a new channel
  • Enter name & description of the channel
  • Select Channel Type as "Twilio SMS"
  • Copy-paste the Account SID and Auth Token from the Twilio account dashboard
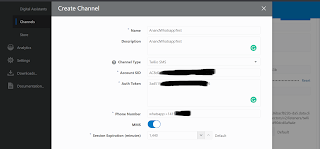
  • In the Phone Number field, enter the phone number you saved on your device which was given by Twilio in the above procedure
  • Make sure you prefix the phone number with "whatsapp:" and the phone number should be in international format. You can refer to the below screenshot for the inputs 
Creating ODA channel for Twilio
  • Click on the "Create" button, the channel will be created
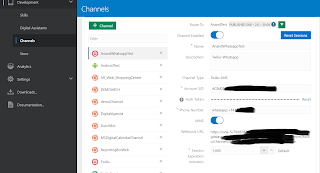
  • Select a skill or digital assistant from the "Route To" drop-down
  • Enable the channel
  • Copy the Webhook URL and past it in the "WHEN A MESSAGE COMES IN" input field of the Twilio Sandbox created in the above procedure
Channel creation for Twilio in ODA

Now the WhatsApp is ready to start the conversation with ODA. You can test the chatbot now. See the below screen for your reference.

Connecting ODA chatbot through WhatsApp


#chatbot #DigitalAssistant #ODA

February 3, 2021

Integrating Oracle Digital Assistant with Oracle Analytics Cloud via SOAP webservice

In this post, you will see the integration between ODA (Oracle Digital Assistant) and OAC(Oracle Analytics Cloud) dashboard.

Creating OAC dashboard:

  • For the integration, we created a sample OAC dashboard as shown in the below screenshot
  • Soap services are exposed for the dashboard
Changes required to the ODA custom component:
  • Add the "soap" module to the ODA custom code node project
  • In the component javascript file, uses the below program code.  Where,  
    • createClient() is the method to create a connection to the soap WSDL which expects WSDL URL
    • Once the client is created, then you can use the methods in the Webservice
    • For example, logon() is a method that takes the user credentials as input arguments and returns a unique session  d which can be used in the further requests
    • Also in the below example, another method executeXMLQuery() is used which also part of the WSDL which expects an XML as input.
var soap = require('soap');
    var url = 'https://XXXX-XXXXXXXX-ld.analytics.ocp.oraclecloud.com/analytics-ws/saw.dll/wsdl/v12';
    var args = { name: 'username@oracle.com', password: "password" };  

    soap.createClient(url, function (err, client) {
      client.logon(args, function (err, result) {
        var sid = result.sessionID.$value;
        console.log(sid);
          rPath = "/shared/COVID19NL/Covid19NL";
 var xmlQueryArgs = {
          report: { reportPath: rPath },
          outputFormat: "",
          executionOptions: { async: '', maxRowsPerPage: '', refresh: '', presentationInfo: '', type: '' },
          sessionID: sid, 
reportParams:{variables:[{"name":"varCity","value":"Amsterdam"},  {"name":"varMonth","value":"Apr"}]}         
        };
 
        var xmlResult = "";
        var transition = "success";
        var filteredRows = [];
 client.executeXMLQuery(xmlQueryArgs, function (err, result) {
          if (err) {
            transition = "fail";            
            console.log(err.body);
            conversation.reply(err).transition(transition);
            done();
            return;
          }
          
          xmlResult = result.return.rowset.$value;
          var convert = require('xml-js');
          var options = { compact: true, ignoreComment: true, spaces: 4 };
          var resp = convert.xml2json(xmlResult, options);
          var rows = JSON.parse(resp).rowset.Row;

          if (rows && rows.length > 0) {
            filteredRows = rows;
            transition = "success";
            console.log(filteredRows);
          }
          else {
            transition = "none";
          }

          conversation.transition(transition);
          conversation.variable('resultRows', filteredRows);
          done();
        });
});
});

June 16, 2018

Oracle Intelligent Bots: Get the user Geo location from the map

For few use cases like delivering a Pizza, it would be a great user experience to take user's current location directly from a Map instead of asking the user to type his address.

In this post, we will see how to capture the user location from a map in a chatbot developed in Oracle ChatBots.

Oracle bots provide a component "System.CommonResponse" which helps us here to get the location. Below is the snippet to get the location.

----------------------------------------------------------------------------------------------------
 userLocation:
    component: "System.CommonResponse"
    properties:
      processUserMessage: true
      keepTurn: false
      variable: "loc"
      nlpResultVariable:
      maxPrompts:
      translate:
      metadata:
        responseItems: 
        - type: "text"
          text: "OK.. Please provide your address to deliver the Pizza?"
          iteratorVariable:
          separateBubbles: false
          rendered: 
        globalActions:
        - label: "Send Location"
          type: "location" 
    transitions:
      actions:
        locationReceived: "locMapReceived"
        textReceived: "locTextReceived"

----------------------------------------------------------------------------------------------------

The above code results as below image.
When the user clicks on the "Send Location" button, it will open the map application. The user can select current or any other location and submit. Once the user submits the location, the bot will receive a JSON into the variable assigned for it which is "loc" in the above example and invokes state assigned to the action "locationReceived". The JSON looks like as below. 

{"latitude":17.727758609852,"title":"Learning's Location","url":"<url of the map>","longitude":83.287353515625}

The JSON contains, latitude, longitude, title of the location on the map and the direct url to the selected location.

In the above example we have another action "textReceived" which helps to handle if user inputs text instead of selection on map.

Note: While implementing this, please check if your client application supports this feature and maps. I tested this with FB and Test console.

April 23, 2018

Oracle Intelligent Bots - Integration with Smooch

Smooch is the complete messaging platform for enterprise software makers. To know more about Smooch click here. Oracle Intelligent Bot made it very easy to integrate your bot with Smooch.

In this post, we will see how to integrate #chatbot developed in Oracle Intelligent Bot(#OracleMobile) with Smooch to open as a web page. Below is the procedure to do the same.

  • Create a channel in the bot for Smooch. To do so,
    • Goto settings of the bot
    • Select Channels tab
    • Click on "+Channel" to create a new channel

    • Enter Name and Description
    • Select Channel Type "Web". You can see a window like below

    • Click on Create
    • You can see a screen like below which contains an app id and app secret to connecting with the clients

  • Preparing a smooch client to connect with the bot
    • In this example, we use a web client to connect with the bot
    • Refer this smooch page and download/create the HTML page from https://github.com/smooch/smooch-web
    • Replace the app id with the id created above
    • Run the web page, you will see a chat widget on the page as below
    • Click on the chat icon and start your conversation with the bot

April 13, 2018

Connecting Oracle Mobile Application Framework (MAF) with Oracle Intelligent Bots

[Oracle Intelligent Bot 18.1.1]

In this post, we will see how to create a client in Oracle Mobile Application Framework (MAF) to connect with chatbot developed in Oracle Intelligent Bot. In this example, I am using bot version 18.1.1 and sample server in the bot instance.

To achieve this, we need to 
  • Create a webhook channel in Bot
  • Create a channel in web socket server
  • Create a client in MAF
Create a webhook channel in Bot

  • Go to settings in bot service
  • Select Channels tab
  • Click on “+ Channel” button, a window will be opened to create a channel
    • Fill name and description fields
    • Select Channel Type as “webhook”
    • Platform version as “1.1 (Conversation model)”
    • Fill Outgoing webhook URI as below (Below is a sample url if you are using sample server and channel id you can copy from webhook url. If you are using other server, please fill this accordingly)
      • https://bots-samples-nodejs:8889/ext/apps/chat/bots/<channel id>/messages
    • Enable the channel and Click on create


Create a channel in web socket server
  • Open admin console of the sample server : http://<host>:8888/ext/apps/chat/admin/
  • Select Channels tab
  • Click on “New Channel” button
    • Fill name and description
    • Copy server key and webhook URL from the bot created above and fill here
    • Click on Save


Create the client in MAF

Please follow below steps to integrate MAF with the web chat client widget.
  • Go to dev-resources of the bot instance and download the web client source code
  • Create a MAF application
  • Go to folder structure and navigate to public_html folder under ViewController folder of the app
  • Copy web client source code folder inside the public_html folder
  • Go to jdeveloper, open maf-feature.xml
  • Click on + icon and create a new feature
  • Under content, select type as “Local HTML”
  • In the copied chatclient folder, there is an index.html page. Select this page for URL under the feature content
  • Open settings.js file inside the chatclient folder
  • Update the Uri and channel id with your bot details
  • User id is hardcoded here to “Anand”, but you can pass username at runtime if required
  • Now, run the app, a chat window will appear in the app


March 1, 2018

Oracle Intelligent Bots: Chatbot integration with Facebook Messenger

Below is the procedure to integrate chat bot developed using Oracle Intellegent Bot Cloud Service (IBCS) with the Facebook channel.

  • Create a Facebook page
  • Make sure you see  "Send Message" button on the page like below

  • If you dont see this button, the follow the below steps, other wise continue to the integration
    • Click on the button or select Edit button option
    • Select "Send Messages" option under "Contact you"
    • Click Next
    • Select "Facebook Messenger" in the step2

    • Now you can see as below

    • Click on Finish. Now your facebook page is ready.
  • Now goto Facebook developer page: http://developer.facebook.com
  • Click on "My Apps"

  • Select "Add new app"
  • Give "Display name", email id and click on "Create App ID"
  • Products page will be opened
  • Mouse over to "Messenger" and click on "Set up"
  • Repeat the same for "Webhooks"
  • You can see both of them added under "PRODUCTS" on the left menu of the app
  • Selecte Settings under Messenger from the left menu
  • Scroll to "Token Generation" section
  • In the drop down under "Page", select the facebook page we created above
  • It will generate a "Page Access Token"
  • Click on the generated token. It will be copied to clip board
  • Open the bot for which you are creating this channel
  • Goto Settings and click on Channels
  • Click on "+ Channel"
  • Enter a name to the channel
  • Enter Description which is optional
  • Select Channel Type as "Facebook Messenger"
  • Paste the copied token into "Page Access Token" field
  • Copy "App Secret" from the facebook app's settings to "App Secret" field in bot
  • Enable channel and click on Create
  • You can observe channel created in bot for facebook with two extra fields Verify Token and Webhook URL. And the screen looks like as below
  • Go back to facebook messenger app page
  • Click on "Messenger", scroll to "Webhooks" section and click on "Setup webhooks"

  • Copy "Webhook URL" of bot to "Callback URL"
  • Copy "Verify token" from bot to this facebook app
  • Under "Subscription Fields", select messages and messaging_postbacks
  • Now the window will look like as below
  • Click on "Verify and Save" button which will create a webhook call back to your bot from facebook
  • Now you can see a new field in "Webhooks" section in the facebook app page
  • Select your facebook page from the drop down which is to subscribe your webhook to the page events
  • Once you select the page, a button "Subscribe" will be visible next to the drop down. Click on it
  • Now your facebook channel is ready to talk to the bot
  • Either make your facebook page public or add users as testers to the page to interact with the bot
  • Open facebook messenger and search for the name given to the facebook page and start sending messages to the bot. You will see the bot responses.


February 21, 2018

Oracle Intelligent Bots: Getting Started with Chat bots - My First Chat Bot- Part 2

Continuation of Oracle Intelligent Bots: Getting Started with Chat bots - Part 1

Now you have the basic knowledge about the Oracle chat bot environment. Let's see how to use this environment and create our first chatbot.

  • Click on New Chatbot

  • Enter Name of the bot which is a mandatory field, and description is optional
  • Your bot window will be opened
  • Before, doing further steps, the bot has a default flow to greet the user. So, let's test the bot first. 
  • Click on "Run" icon which is on top right corner
  • Test window will be opened
  • Type anything to start the bot flow. Let's say, "Hi". Now you can see the bot response as below
  • Let's see the dialog flow for this default bot
  • If you observe the dialog flow, we can see different sections but below are very important out of those
    • Variables: variables created to use in entire bot in any state.
    • States: To define the flow in various states. 
    • System.Intent: Is a component name which will map the user input with the corresponding intent and its state defined in the flow
  • Now, let's change this bot
  • Goto Intents
  • Click on the "+ Intent" button to create new Intent
  • Give a name to the Intent. Ex: MyBot
  • Give some statements to identify the intent under "Examples" section, which we call as utterances
  • Select "Flow" from left menu and write the YAML code as below
  • You can observe a button called "+ Components" on top left corner in "Flow" which provides a menu to choose system components
  • In the flow, the first state is "startBot" which is to identify the intent and the corresponding state 
  • If you enter any statement which does not match with any of the utterances, then it will go to "unresolvedIntent"
  • Now run the bot. Let's type "Hi" again. This time you can see a message which we defined to "unresolvedIntent"
  • Now, give any statement from the given utterances like "about". You can see the defined flow will be started. And the bot  will look like as below

Oracle Intelligent Bots: Getting Started with Chat bots - Part 1

In this post, we are going to see how to create a sample chatbot using Oracle Intelligent Bot Cloud Service (IBCS).

Before developing the chatbot, we should understand the terminology.
  • Intent: The entry point of any conversation or use case by describing the various actions that your bot helps its users complete. It enables bot to recognize user input because each intent has a set of typical user statements associated with it.
  • Utterance: It is a typical statement or sample data for an Intent which helps to train the bot. Need to add a good pool of utterances to each intent which will decide to choose the Intent. It is not necessary to be exact string matching.
  • Entity: It is to provide a context to enable your bot to complete a user request. It is a variable or parameter for an Intent or an important word in an input. It is a re-usable component.
  • Dialog Flow: The dialog flow describes how your bot reacts as different intents are resolved. It defines what your bot says to its users, how it prompts them for input, and how it returns data. Think of the dialog flow as a flow chart that’s been transposed to a simple markdown language. In Bots, this markdown language is a version of YAML called OBotML.
  • Custom Components: To put your bot’s intelligence to work, you need to add components and then create a dialog flow. At present, we have two types of components. One is System components which are available by default with the bot and the Other category is custom components which are developed in external systems, used in the bot to completed the flow for the user request.
  • Channels: Enables user to connect to messaging clients like Facebook Messenger, WeChat or any other custom clients like mobile apps, web applications. Oracle IBCS provided client SDKs using which we can generate custom clients as well to interact with the bots.


     Please find the above screenshot of an Oracle Intelligent Bot Cloud Service. All the components discussed above are pointed on the image.
     This image is from a "Finacial Bot" where Balances, Send Money, Transactions etc are the list of intents. The statements like "Do I have enough balance?", "How much do I have available?" etc are utterances for the Intent "Balances", which means when the user gives any of these statements to the bot, then the bot will fetch the "Balance" intent.
     You can also observe "Resource Bundle" on the image which is a new feature in the IBCS which helps to train the bot for multi-language support.

     We will see how to develop our first bot using Oracle IBCS in the next article: Oracle Intelligent Bots: Getting Started with Chat bots - My First Chat Bot- Part 2